HP35 Operating software
 The architecture of the calculator is quite canonical and is a common
denominator of this class of machine at that time (HP, TI, Sharp and others).
The architecture of the calculator is quite canonical and is a common
denominator of this class of machine at that time (HP, TI, Sharp and others).
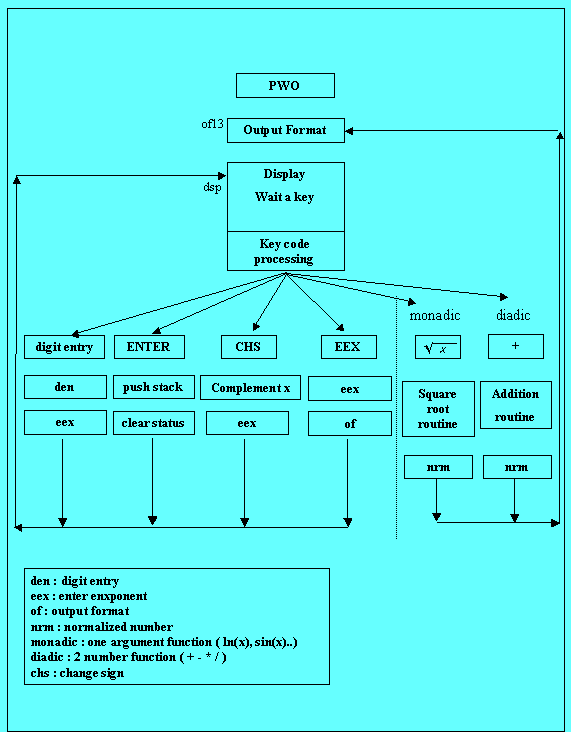
I summarize it in
the diagram left.
Compared to the late
70’s Basic Rom systems (like MITS Altair or TRS80), the calculator software is
much simpler:
- there is only one
state: the “run” mode,
- the Rom is much smaller (8
Kbits vs 4Kbytes for the first version of the MITS ALTAIR – 1975),
- input are only
floating point numbers.
The working model
can be summarized in a few words:
Step 1: the system
runs a prologue code where registers are initialized,
Step 2: with a display context properly formatted, the system enters in its wait
state, looping to display the former result (can be “0.”) and waiting for a user
interaction,
Step 3, the user has hit a key, the key code returned by hardware is a
displacement to calculate the ROM address of the routine to execute,
Step 4: when routine’s execution is over, output is again formatted and the
system re-enter in the wait loop.
Let’s dig a bit.
1) At power on time
(PWO) when the slide is “on” and when the power is applied, the system jumps to
ROM address 0000, This is the initialization sequence but the same code will be
executed later for CLR key service.
The sequence clears registers, clears status bits and set up the pointer. Another
entry point in this code exist for the CLx keys, the cleaning is not so hard and
the C register is preserved (display).
2) Secondly, the
system enters in a routine that soon will become familiar: Output Format (of13).
There the proper context for display will be built:
- in register C the
number in normalized form,
- in register A, the number in floating point form,
- and in B the display mask.
I will detail below this 3 form representation.
If the calculator is in the PWO or CLR mode, the first number is zero and the
display built is “0.”
3) Third, the
machine is entering in its “idle” state doing what it does when it does nothing:
display and wait_a_key loop (dsp). There the life is easy, displaying the
previous result (X in C register) and waiting for a key to be hit.
Logically, the user
would now enter data. Digits entered are processed in the “den” and “eex” group
of routines. “Den” (“digit entry”) is making a floating point number and a mask
out of individuals digits, “.” and possibly “EEX”, while “eex” is building
normalized mantissa and exponent.
When the number is
entered, back to the farm in the “dsp” display and wait loop.
If instead of digit,
a service key is pressed, the “action” code is immediately executed.
Keys are decoded by the system as a key code number made from the keyboard
matrix. When the user presses the “1” key, the key code buffer holds the value
“34”: address 034 (octal) is the entry point for “digit 1” routine.
Note that “key code”
is very similar to “token” in a Basic ROM system (the action verbs were entered
in ASCII but stored as a token internally): it is a displacement on the entry
points table.
Now, the machine is
ready to perform a calculation: if the user press the “ln” key (key code 06),
the operating system will branch to address 006, which is the entry point of
the log routine.
The routine code
performs the calculation, at the end a normalization of the result is applied
(nrm21), the OS branches to “of” routine to format the output (build floating
point and mask representation) and next to “dsp”, to display result and wait the
next key.
If the user wants to
do a dyadic (2 number) function, the ENTER key must be used to push the first
number on the stack, the second number is entered and the operation (say +)
must be applied.
This article will
cover all the operating software (open chapters with left buttons):
-
data entry
digit by digit and building numbers in A, B and C registers (mainly routines “den” and “eex”),
- normalization of a result on exit from a math
routine,
-
output formatting
which makes A and B registers from a normalized result,
-
display and wait loop
(April 2006),
-
the 4
level RPN stack (April 2006),
-
the status
bit flags (April 2006),
-
the key codes tokens,
-
the rest of the service
routines (keys ENTER, CHS, CLR, CLx, STO, RCL etc,) that are not treated in
the mathematical articles (April 2006).
This will complete
the full software reverse engineering of the HP 35 firmware.